How to install heated floors

Before we get into how to install heated floors, we first must understand what heated floors are, and why homeowners choose to install them.
Why install heated floors
Heated floors are one of the most popular heating options. There is something luxuriant, almost decadent, about the feeling of warm floors under your feet, but it’s also one of the best ways to heat a room. By delivering heat across the floor and allowing the heat to rise, it can provide a more consistent temperature than other forms of heating. And, apart from the controls, it’s almost invisible, removing the need for unsightly radiators.
Indeed, it’s been popular for thousands of years. Underfloor heating was common in Roman villas, and archeologists have found evidence of floor heating systems that dated to 7,000 years ago. The good news is that with thousands of years of development, modern floor heating is a luxury that anyone can have.
Heated floors bring more benefits than just comfort. A well-installed system is energy efficient, especially in smaller rooms, helping the environment and keeping energy bills low. They can make homes healthier, since it makes ‘cold’ floors, like tile, more attractive, reducing the use of coverings like carpet or rugs which can trap allergens and bacteria. There is also some evidence that they reduce accidents, such as trips over heaters because it’s all under the floor, or slips on wet surfaces because the heating can speed evaporation.
What to consider when installing heated floors
The basics behind every heated floor system are identical. In essence, a heated layer will sit beneath the top surface. This will heat, through conduction, the floor surface. This, in turn, will radiate heat into the room. Other than to the expert eye, the only evidence of a floor heating system will be a control panel.
However, beyond this simple model, every installation will be different. Factors like power supply, room size and shape, flooring type, and the heating system you are using will all affect the work involved. Always be sure to fully read the manufacturer’s instructions and plan your work carefully, and if you have any doubt, consult a professional. Heated floors can be easy to install, but fixing an installation mistake can be much, much harder!
These instructions provide a general overview of the steps involved.
1. Fully prepare the area for installation
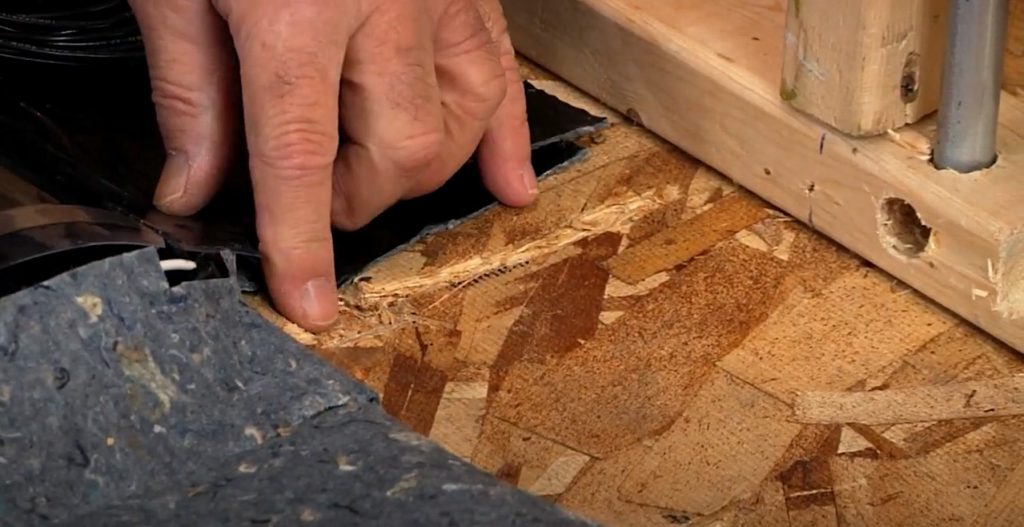
Electric floor heating is installed directly between the subfloor and the final surfacing. Before starting the installation, ensure that the subfloor is fully prepared. It should be level and clear of any defects, for example protruding nails or screws, that might damage the heating mats or cabling. If you are installing over a concrete floor, ensure that a moisture barrier is in place and secure.
High-quality underlayment can insulate the heated systems from the cold subfloor as well as provide a moisture barrier. It will also prove useful when creating channels for the heating system’s wiring. QuietWalk underlayments work well with most heating systems.
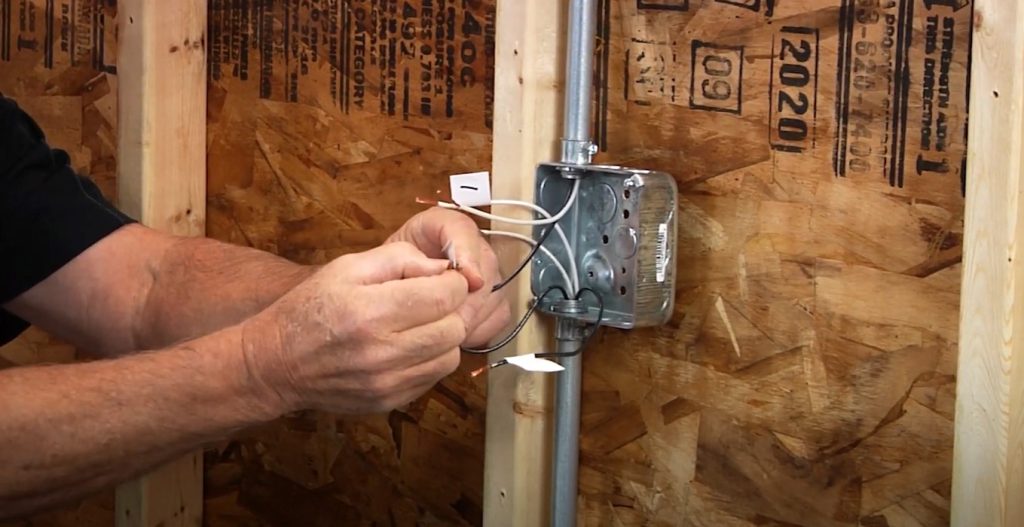
You will also need a new junction box to supply power to your heating. For most people, this will mean using a licensed electrician. Think about where this box will go, along with the final location of the heating control panel, since that may affect the phasing of the work.
2. Test fit the heating
Cable or Mat?
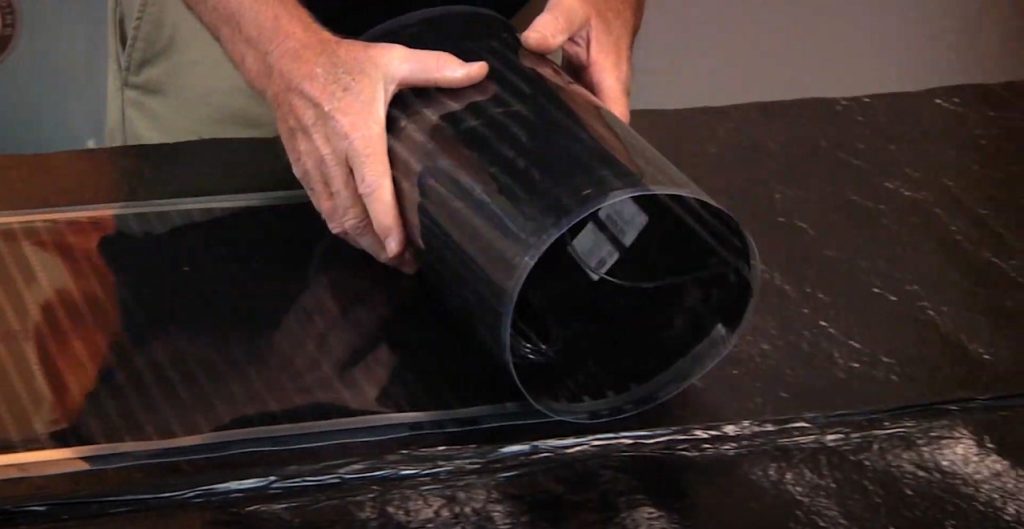
Electric heating systems mainly come in two types, cable or mats.
Cable systems offer a lot of flexibility since the cables can be laid almost anywhere you want them. It’s an ideal way to install heating in oddly shaped rooms. However, they do require more work since the cables have to be held in place. And it also requires a lot of planning, ensuring the cables cover the area without crossing over while maintaining a consistent amount of heating cable across the whole floor. Mat systems are, for most people, much easier. The mats will be threaded with the right amount of heating elements, meaning they can just be rolled out. And because the mat, rather than the cable, can be fixed down, it reduces the risk of damage during installation.
Layout the heating
Whichever system is used, lay out the entire area before fixing anything in place. This allows you to check your plan practically, ensuring that you have even coverage and helping you to identify any difficult areas.
If you are using cable, loosely tape this down as you go. And with both mats and cable, ensure that they lie flat, with no overlap. They cannot run through or under anything like walls or baseboards, and there should also be clearance from walls and fixtures like showers, baths, and toilets, manufacturers’ guidance will vary, but this is typically five or six inches.
3. Check the installation
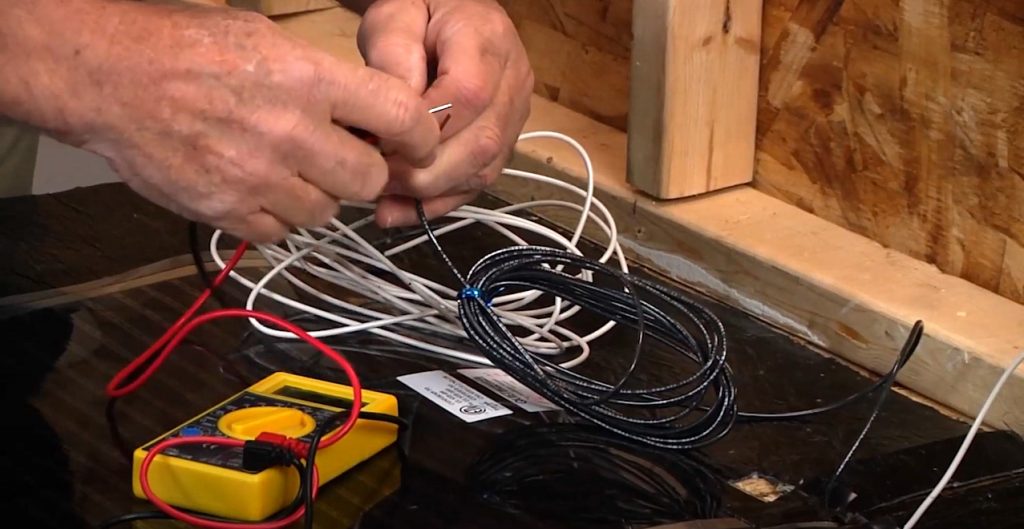
It’s good practice to check the mat regularly to ensure that it is working correctly. Electrical floor heating works by resistance, with the current creating heat in the wires. It must do this safely. If something goes wrong, it might just mean no heat, but an electrical short can have catastrophic consequences.
Use a digital multimeter to measure the resistance (or ohms) at key points in the installation. The manufacturer’s instructions will contain details of where you should test and the measurements you should read. If everything is correct at this stage, then you can be confident you’ll have a heated floor at the end. However, it’s worth rechecking periodically to ensure that some unnoticed damage hasn’t occurred.
4. Fix the installation in place
Once you are happy with the layout, and have tested the cables or mats, you can start fixing the installation in place. This step will depend on the type of mat or cable you are using. Some mats, for example, even have adhesive.
Whatever way you are fixing the heating in place, ensure that it lies flat and that there are no bumps or bubbles created by the matting. Floor heating works by convection, so any air gaps at this stage will reduce its efficiency, and may create problems when laying the final floor surface.
You should also create some channels in the subfloor, using a tool appropriate for the material, for the cabling that will run to the junction box. By this stage, you should be close to having a working heating system, and it is a good idea to test using your multimeter again. It’s also a good practice to take some photos of the system in place, and label cables to make it clear what each is. Together, they can prove invaluable if needed for troubleshooting the installation, whether during the process or years later.
5. Complete the electrical installation
Now that the heating is in place, it can be connected to the power and the control panel. You may want to use a licensed electrician for this stage. However, if you choose to undertake it, ensure that the power supply is turned off while you are working with it, and follow the manufacturer’s instructions for testing.
Once you have tested the full installation, turn the power off again. Floor heating is designed to work when fully installed and covered by the flooring, and using it before installation is complete can risk damaging the system.
6. Install the flooring
Floor heating usually has to be encapsulated in a mortar bed however, QuietWarmth’s advanced ink technology is thin enough to prevent the need for any extra messy self-levelers or mortars. This will save you from the time investment and the headaches that come with using self-levelers or mortars. QuietWarmth provides different systems for different floor covering materials which can be seen below.
If you’re still using mesh mats most mortars and compounds are suitable, it’s worth checking since some might not have problems with the changes in temperature that come with use. While laying your mortar or compound, take care not to damage any wires and fully cover the system. It is, again, worth testing your floor heating system as you go, so you can identify any damage caused during the installation process.
Installing heated floors under floating floors
QuietWarmth for Floating Floors makes flooring installation quick and easy. Once you have everything in place, simply lay the floating floors over the heating system, being careful not to damage the mats or wiring along the way. This saves time since you don’t have to wait for any mortars to dry.
Installing heated floors under tile flooring
QuietWarmth For Tile is great because it cuts down the installation time needed by eliminating the need to use self-levelers over the heating mats before laying the tile.

Installing heated floors under existing floors
Floor heating is, undoubtedly, much easier to install before the final floor surface, but what about under existing floors, for example, wooden boards in older houses?
The good news is that it is possible. But follows a different method and uses heating panels or mats designed to be attached to the joists. Rather than heating the surrounding mortar and floor through conduction, they warm an air gap created between the heating elements and the floor. This air gap warms, heating both the floor and the air above through any gaps.
Installing under an existing floor can be a simpler process since the mats are designed to be attached to the joists, it can require less preparation — there is less contact, and therefore less risk of damage — and there is no need to mortar afterward. It can be as straightforward as stapling the heating mats in place and checking as you progress.
However, gaining access can be difficult, especially if there is limited space. And because it requires specially designed mats, you are reliant on them fitting, something that cannot be guaranteed, especially in older buildings that were constructed at a time with fewer building and construction standards in place. It’s wise to thoroughly check your floor and research your options before committing resources.
QuietWarmth for Existing Floors makes the installation process simple and quick!
Using the heated floors
Although you might be eager to test your heating, ensure you follow the manufacturers’ instructions for the first use. This can be particularly important for some installations, for example under tile, where you might need to allow the mortar time to cure. But, once you are good to go, prepare yourself for that unbeatable feeling of a warm room and toasty toes at the flick of a switch or the click of a timer.
Join Our Newsletter
You are about to install your new flooring. As you lay the first plank you realize that